Create | Settings | Columns | Link | Edit | Actions | Import | Export | AI assistant | API access | Power query | Clear data | Review
Define data sets
Data sets are configurable objects that store your data (think of them as Excel worksheets, or database tables, or tabular lists). You can give each data set a name, define its columns, set user permissions, and import data.
You can also watch the tutorial video.
When you sign up, your tenant already has a number of predefined data sets, aimed at financial reporting. They contain example data of a fictitious company. You don't have to start from scratch, you have working examples which you can start with, and you can add or change data sets at any point in time.
Some common examples of data sets are:
- Financial data
- List of companies
- List of customers
- List of business units
- Chart of Accounts
Data sets don't need to exactly replicate the structure of your existing data, because you can convert your data during the import anyway. It is best to design them in such a way that they are optimal for reporting purposes.
Create a data set
You can create a data set in two ways (watch the tutorial video):
- Click on Define - New in the sidebar menu, or click the New button in the top of the screen.
- Click on the Actions - Create new button of an existing data set. This also enables you to make a copy of an existing data set.
Either way, the rest of the process is the same, and you can enter a name for your new data set, set user permissions for it, and define its columns. The columns of a data set are shown in Excel-style with a preview of their data:
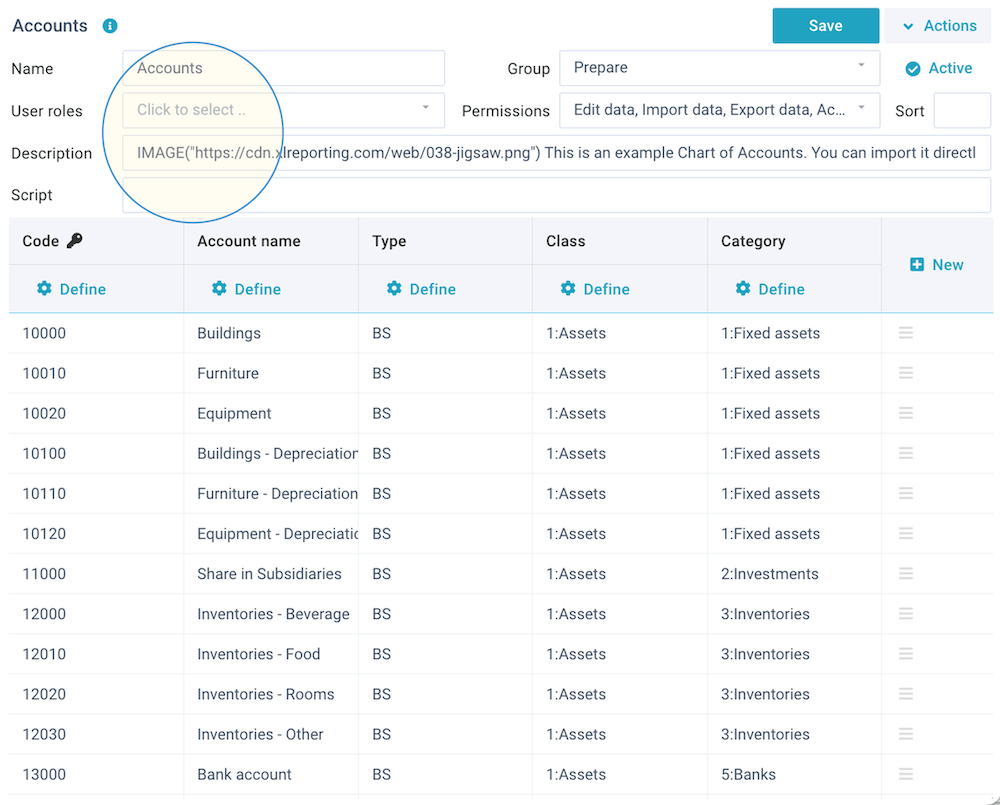
Settings
You can define the settings for the data set via these fields:
- Name - enter a name. This must be unique within all your data sets.
- Group - select how this data set is to be shown in the menu navigation.
- Active/locked - activate or lock a data set. When locked, no data can be imported or edited, and no reports and models can be defined or run on this data set.
- User roles - select one or multiple user role(s) to restrict access to this data set. If you leave this blank, all users have access.
- Permissions - select the permissions for access to this data set (in
others words: do you allow this data to be manually edited, imported, exported, or used by
reports or models?):
- Run reports - enable this data set for Define reports, to allow reports to be created on this data set.
- Run models - enable this data set for Define models, to allow models to be created on this data set.
- Save models - enable this data set for Save queries in Define models, to allow user data from models to be saved into this data set.
- Edit data - enable this data set for Edit data, to allow users to manually edit the content of this data set. This is typically used for maintaining lookup lists and other information that is maintained in XLReporting (not imported from other systems).
- Import data - enable this data set for Define imports, to allow data to be imported into this data set. This is typically used for data sets that contain transaction data which is imported from other systems.
- Export data - enable users to export the raw data in this data set to Excel, CSV, JSON, or PDF. Disable this option if you want to avoid sensitive data being accessible other than when used in defined reports and models.
- Clear data - enable data in this data set to be cleared.
- Access API - enable external API calls to this data set.
- Sort - define an (optional) sort order (1-9999) that determines where this data set is displayed in the menu. If you leave this blank, the data set is ordered alphabetically.
- Description - enter an (optional) description to explain the use of this data set to users. The text can contain basic html tags to format your text (e.g. <br> for a next line, <b> for bold text). The text can also contain functions to include dynamic information or images in the text.
- Script - create a script to process data before it is being stored in the data set. This option is for advanced use, and only visible if your user role has the relevant permissions. Read more about scripts.
Define columns
The columns of a data set are shown in Excel-style with a preview of their data:
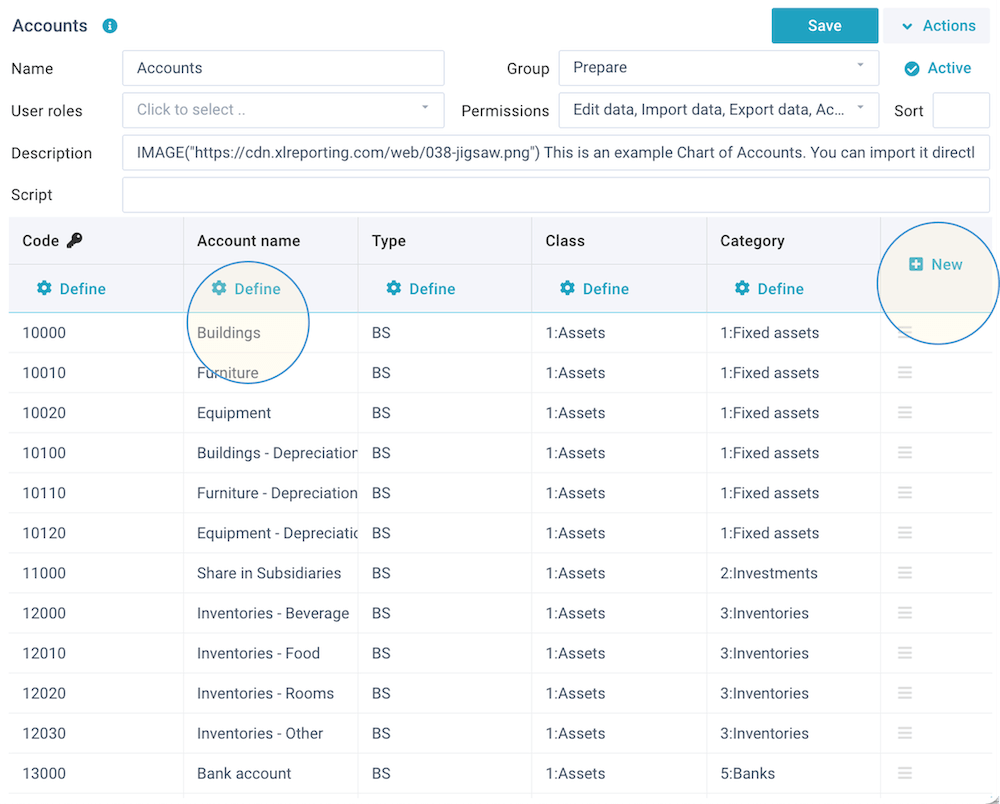
You can edit or delete an existing column by clicking on its ⚙ column header, and you can add new columns by clicking on the + New header in the last column. If you want to change the order of the columns, just drag them to the left or right.
You need to give each column a unique name and select a data type for it:
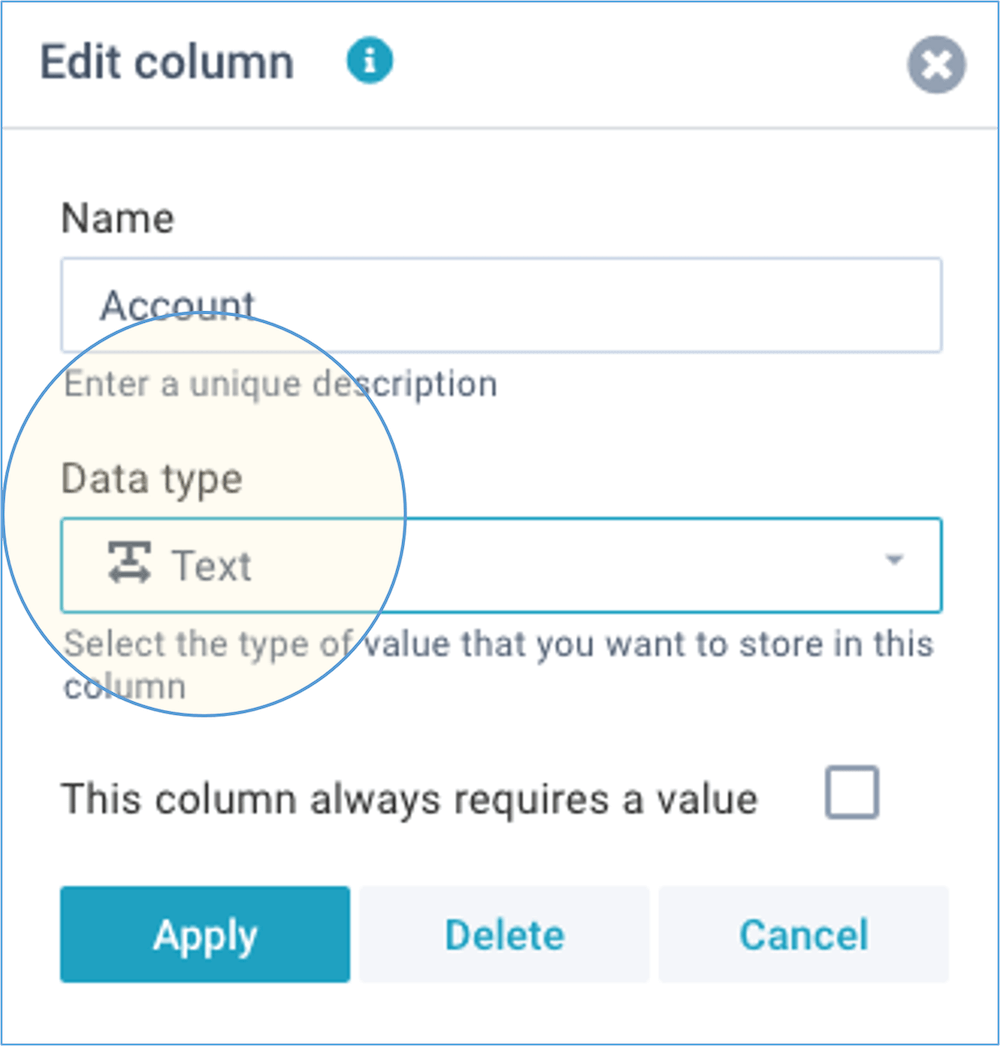
You can choose from 9 data types:
- Text - This is the default type. You can store unlimited number of characters.
- Number - Numbers and amounts. You can specify the number of decimals to control the precision of the stored numbers.
- Date - Dates. You can specify the date format in your profile.
- Period - Use this type to store financial periods in the format YYYY-MM.
- Checkbox - For yes/no values.
- List - A dropdown list. You can define the list of values, separated by a comma. Selection of a value will be mandatory. If you want to allow an empty value, you can use a single space.
- Combo - A combo list is similar to a list, but selection is optional, and users can enter any value.
- Key value - If you want to use data sets for lookups, you need to set one column as Key value. This column needs to contain unique values. As an example: in a product list, the key value would be the product number because that uniquely identifies every product.
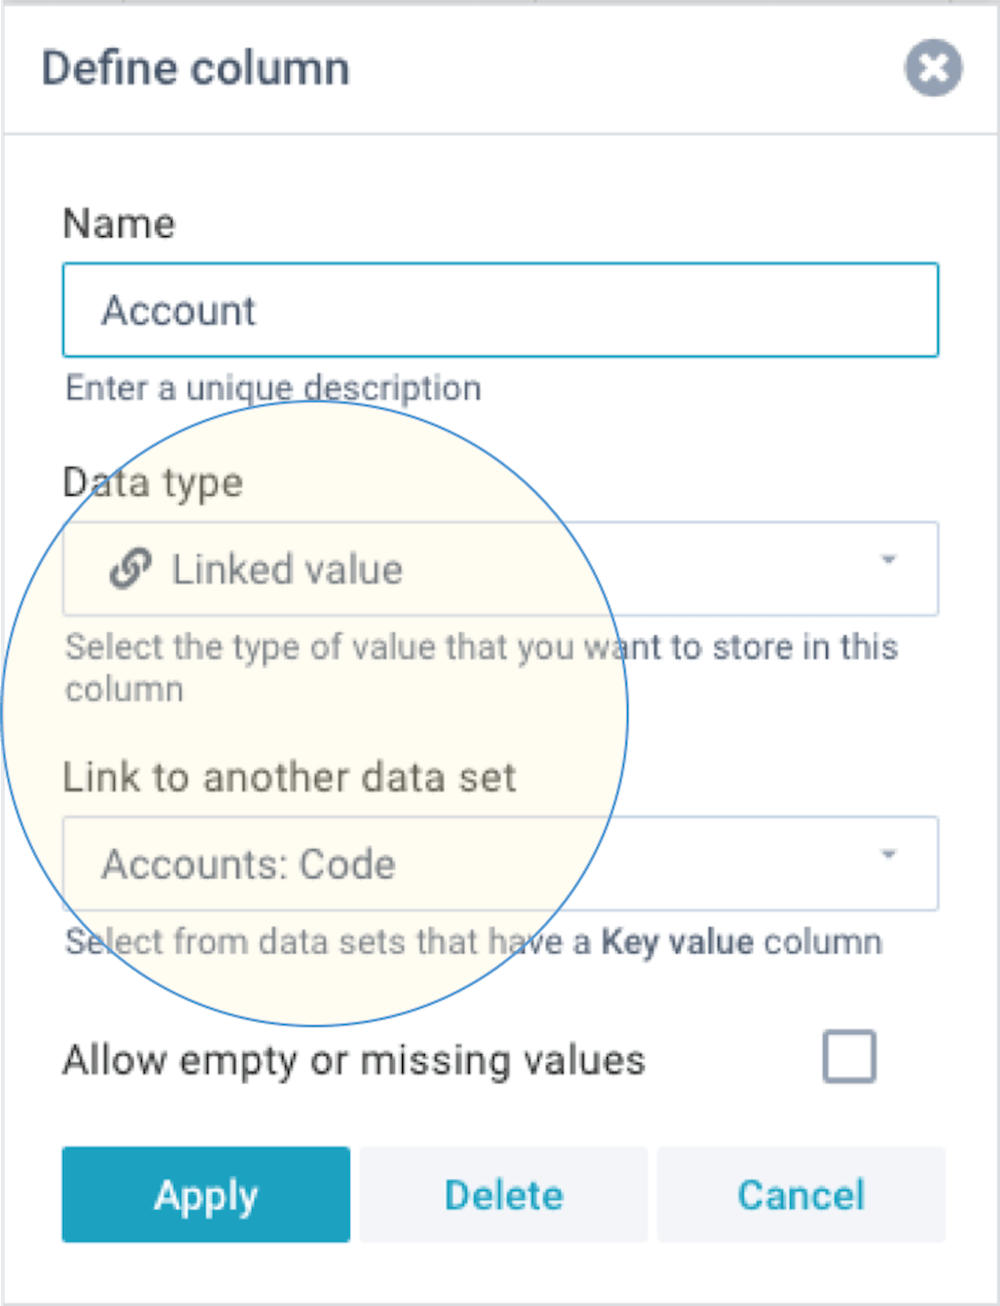
- Linked value - If you want to link this data set to another data set, select that data set and column here. Selection of a value will be mandatory, and data integrity is validated during data import. The dropdown shows all data sets that contain a Key value.
Dependent on the data type you have selected, you can choose to enable This column always requires a value to make this column mandatory in Edit data and Import data.
Link data sets
There are 2 ways in which you can link information between multiple data sets:
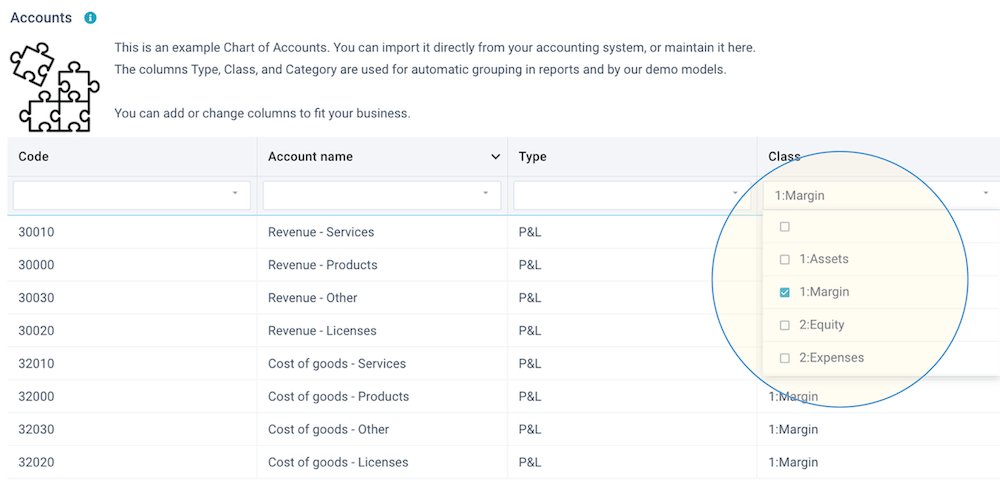
- Dropdown list - by setting a column to data type List or Combo (see above data types), you can create a dropdown list based on the values in another data set. This enables you to restrict the content of a column to certain values. XLReporting validates the data during import and user editing. When user are editing data in Edit data, they will be presented with dropdown lists.
- Linked value - by setting a column to data type Linked value, you create a link between 2 data sets. The values between a Linked value in a data set and the Key value in a related data set need to correspond. XLReporting validates the data during import and user editing. Linked data sets -and their combined columns- will be automatically available in reports.
If you select Linked value, this field is required to have a value, and that value must exist in the linked data set. In other words: by default, empty or missing values are not allowed. If you do want allow that, you can enable Allow empty or missing values.
The below example shows how a Dropdown list is used:
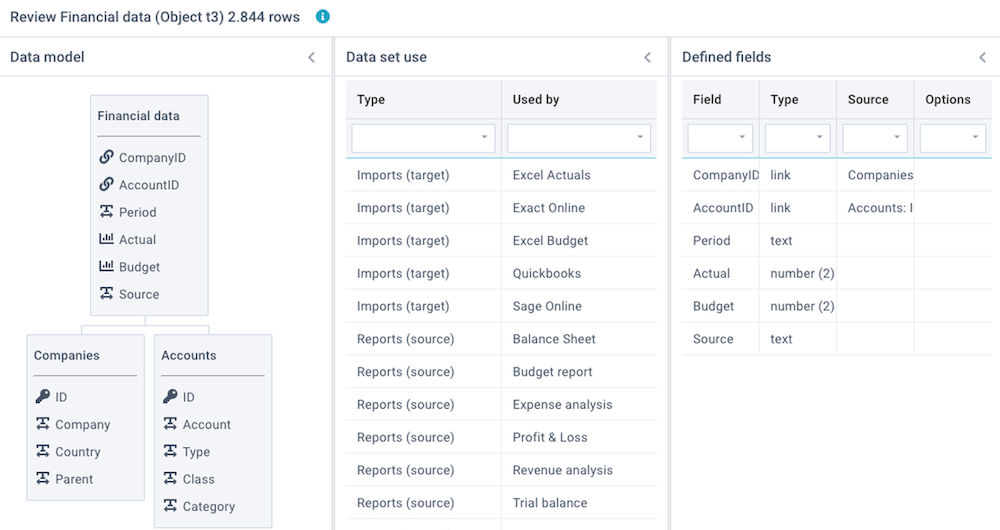
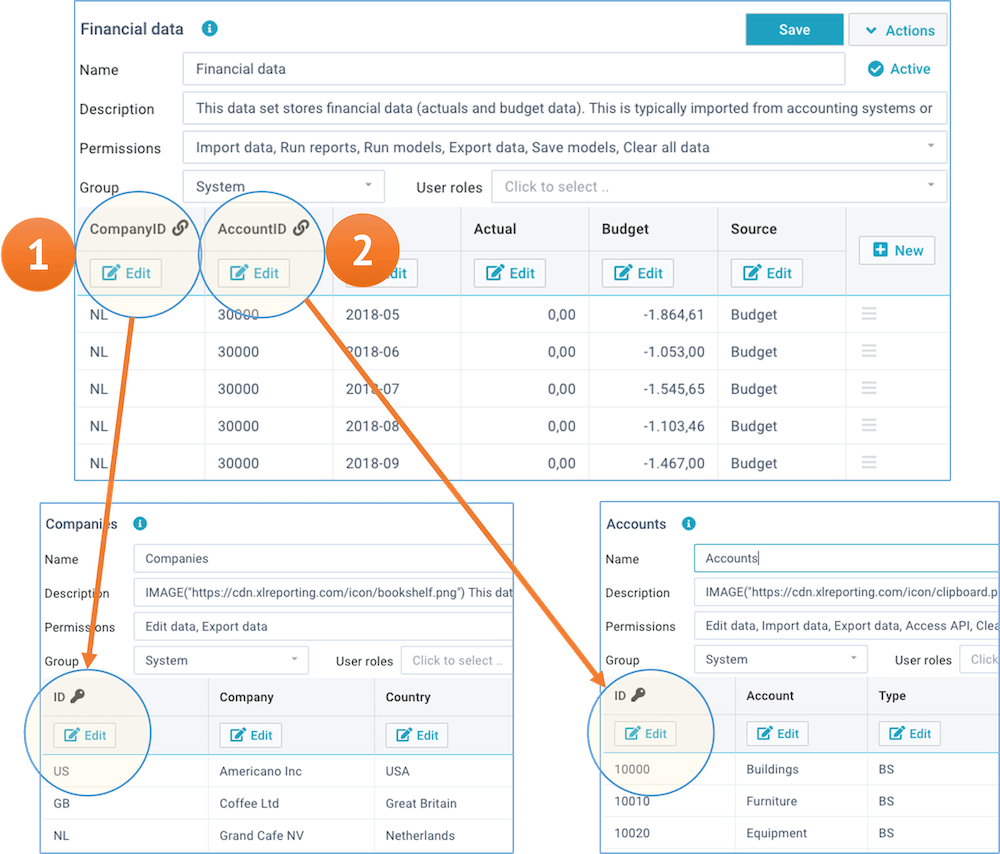
The below example shows how Linked value is used to link a data set (that contains financial data) to 2 other data sets (one contains the list of companies, and the other contains the Chart of Accounts):
Edit data
When defining a data set, you can manually add, edit, and delete its data in a spreadsheet-like manner. You can edit any column in any row. In List, Combo, and Date columns you can select from a dropdown with the list of values. To insert, delete, copy, or move rows, you can either right-click on a row, or click on the ☰ button in the last column of a row:
If you don't want to manually enter the data, you can also import data from a file via Actions - Import data.
You can also watch the tutorial video.
Actions
When defining a data set, you can use the Save and Actions buttons in the right-top of the screen:
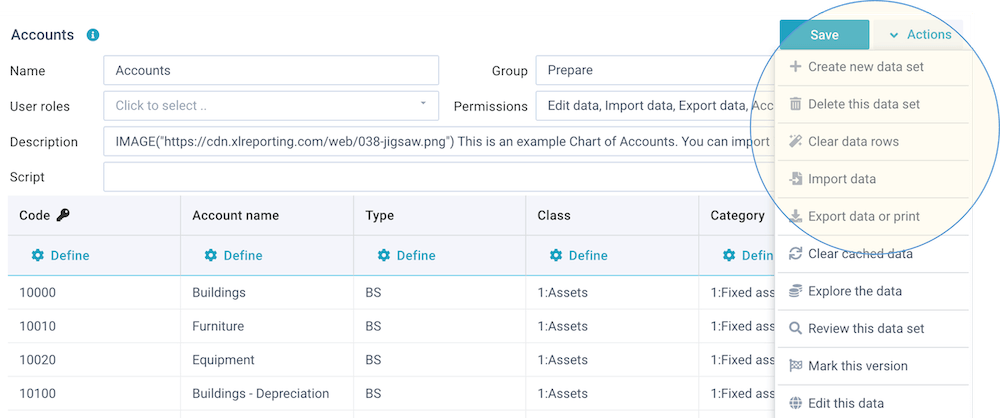
These buttons enable you to do the following:
- Save - save your changes (or Ctrl+S)
- Actions - open a dropdown menu with further options:
- Create new data set (or copy one)
- Delete this data set
- Import data
- Explore the data
- Clear the data
- Export data or print
- Run AI assistant
- Get API access
- Review this data set
- Mark this version
- Edit this data
Please note that the list of actions is dependent on the permissions (in your user roles) that you have been given, and the permissions that have been set for this data set.
Import data
Click on Actions - Import data to import data from a file or from another system. After you have selected your source, you will see a data preview:

If you selected an Excel workbook, you will be able to select which sheet within that workbook you want to import. For Excel workbooks or text files, you can also indicate at which row the data starts (enabling you to ignore empty or title rows in files) and whether your file contains column headers. It is preferable to use files that contain header names, because it is easier to work with column names when importing data. If your file does not have header names, the columns are referred to by letters (in Excel style: A-Z) or column numbers (1-99).
Once you have reviewed the data, click on Apply and you will be given the following choice:
- Create columns - create new columns based on the content of the file. Existing columns are not affected, and no data will be imported.
- Import data - import the data itself. This will overwrite the existing content of the data set. Be careful with this option!
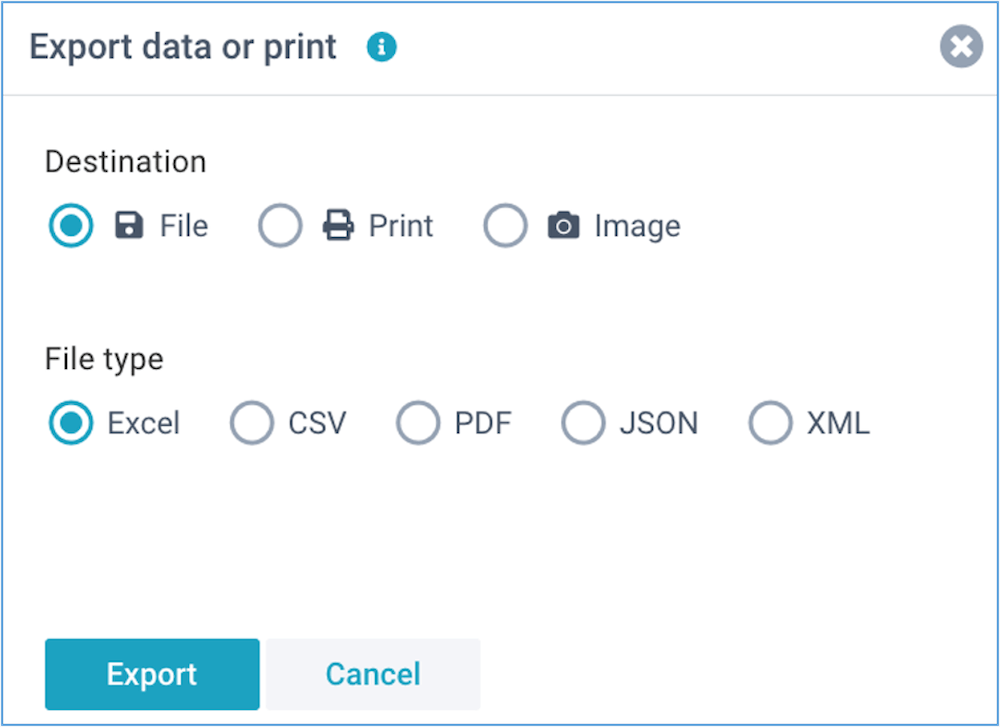
Export data or print
All data in XLReporting can be exported to Excel, PDF, JSON, XML, CSV, as well as be printed, and
imported from files where applicable. If you have lots of data to be edited, it can sometimes be
faster to do that in Excel using search & replace, copy down etc. Simply export the data, edit
in Excel, and import it back again.
Please note that this option is only visible if
your user role has Export data permissions.
You can also watch the tutorial video.
AI assistant
The AI assistant can automatically convert, translate, and transform your data. Please refer
to Run AI assistants for more information.
Please note that
this option is only visible if your user role has Run AI assistant
permissions.
Get API access
You can retrieve data from -and import data into- data sets through our API. For example, you can send data directly from another system or database into your data sets without having to go through the web pages. You can also retrieve data from your data sets to send it straight into another system or even directly into Excel or PowerBI.
Please note that this option is only visible if your user role has Access API permission, and only for data sets that have Access API permission.
Click on Actions - Get API access for instructions, properties, and examples:

XLReporting provides the following API methods:
- Get all data - returns the data content of the data set.
- Power query - creates a file that you can open in Excel or PowerBI to establish a direct and realtime connection to the data set.
- Get schema - returns a list of all data sets.
- Get row count - returns the number of data rows in the data set.
- Get column info - returns the defined columns, and the properties of all columns.
- Get column values - returns the list of unique values from the data in a given column.
- Import data - import data into the data set.
- Clear data - clear selected data from the data set.
- Clear cache - clear all cached data for the data set.
You need to provide a valid API token with all requests. Tokens are linked to users, and you can request a token through Manage - Profile - Actions.
Read more about API integration.
- Be cautious when you enable API access. Only do this when you are really using API calls and always use the "principle of least privilege".
- API tokens are valid for 360 days, but will expire immediately when you revoke or renew your token, or when your API permissions or user account are deleted.
- You will be timely notified by email when your token is due to expire.
Power query
In addition to exporting data sets to Excel, you can also access data sets directly from Excel or
PowerBI using Power queries. This enables you to design your own reports in Excel or PowerBI
using realtime data from XLReporting. The data will be automatically refreshed at any time
without you having to login to XLReporting.
XLReporting creates a small file for you
specific to each data set, which you can open in Excel via Data
- Get external data.
You can choose to store your API token and selected
values in the file, or leave them as runtime parameters.

Clear the data
Click on Actions - Clear the data to clear either all data, the selected rows (based on the column filters), or the cached data for this data set. Using a preview, you can view and select the rows you want to clear:

The cached data is a in-memory cache of a data set, which is used for maximum performance of reports. XLReporting automatically clears it as soon as data is changed or imported. It is only in exceptional situations that you would ever need to clear the cache manually.
Review this data set
Click on Actions - Review this data set to review a number of aspects of this data set:
- Data model - shows a diagram with all linked data sets. This is derived from columns that are set to data type Linked values.
- Linked objects - shows all linked imports, reports, and models that are using this data set, and the total number of data rows in this data set.
- Linked data - shows the results of checks on the Key values and Linked values that are used to link data sets. Because linked values need to correspond with key values, this integrity check is important.
- Defined fields - shows a summary of all defined columns and data types.
- Recent activity - show all recent user activity relating to this data set.
You can also watch the tutorial video.