Manage your users
Users are persons with access to your XLReporting tenant. Each user has his or her own login and personal dashboard(s).
You can also watch the tutorial video.
Create users
You can create a user in two ways (watch the tutorial video):
- Click on Define - New in the sidebar menu, or click the New button in the top of the screen.
- Click on the Actions - Create new button of an existing user. This also enables you to make a copy of an existing user.
Either way, the rest of the process is the same, and you can enter the email address and name for your new user and define the other settings:
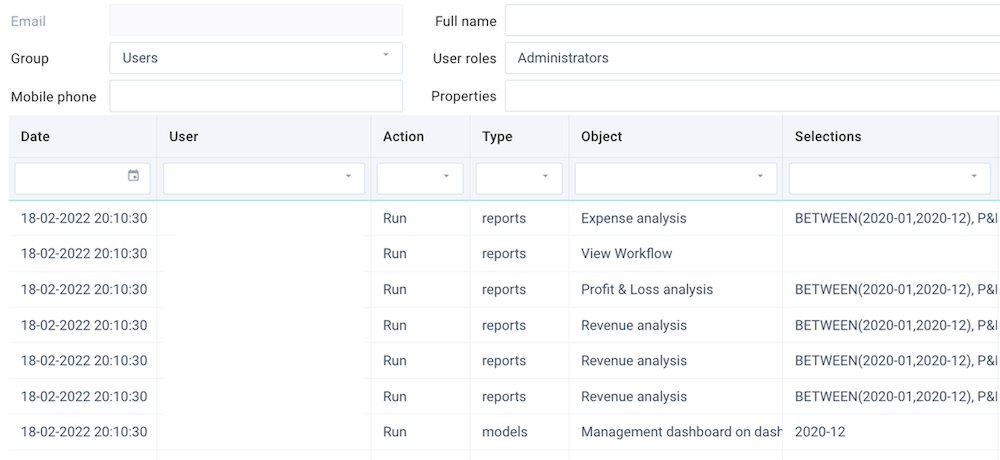
The user's email is also the login for XLReporting. User activation, password reset, and system notifications all require the user to have a valid email address. This page also shows all recent activity of this user.
Settings
You can define the settings for the user via these fields:
- Email - enter a valid and unique email address. The email is also the user login for XLReporting.
- Name - enter the person's name. This name must be unique within all your users.
- Active/locked - activate or lock a user. When locked, the user can not login.
- Department - enter the department of the user (optional). Enter the department, or press arrow-down for a dropdown list of existing departments.
- Job title - enter the job title of the user (optional). Enter the job title, or press arrow-down for a dropdown list of existing job titles.
- Group - select how this user is to be shown in the menu navigation.
- User roles - assign one or multiple user roles to this user. This determines the permissions of this user.
- Mobile phone - enter the user mobile phone number, including the country code. Phone numbers must be between 9 and 16 digits. This is also used for system notifications by SMS.
- Properties - define optional properties for each user that you can lookup in any import, report, or model using the USER() function. This is optional.
- For security reasons, you can not change your own email address, or activate, lock, or delete your own user account. This can only be done by another user with relevant permissions, or you can contact us.
- If the tenant security option Enforce SSO in Manage - Profile is set, the options Email invite and Reset password are not visible.
Properties
Properties enable you to define optional settings, either just by name or as a "name=value". You can lookup these settings with the USER() function in your imports, reports, and models. This function returns true or false if the given setting exists in the user, or its value if you used "name=value". See the USER function for more details.
Please note that properties are case-sensitive. It is best to avoid using spaces, as well as the following reserved names of user fields: "name", "email", "login", "roles", "permits", "group", "ip", "browser", "language", "platform", or "signon".
Actions
When defining a user, you can use the Save and Actions buttons in the right-top of the screen:
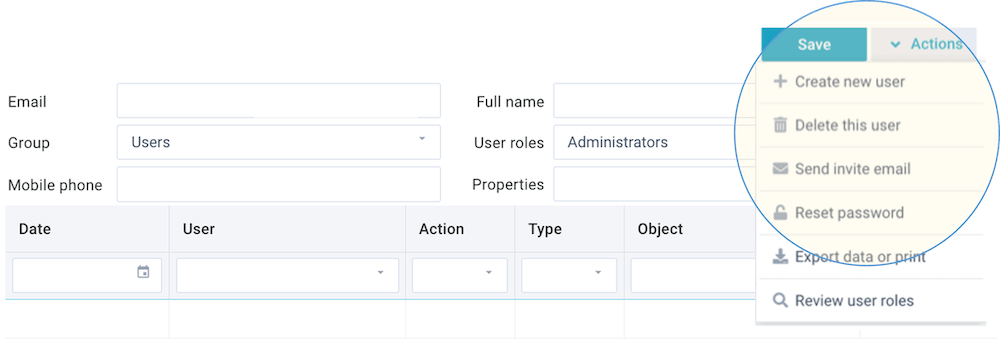
These buttons enable you to do the following:
- Save - save your changes (or Ctrl+S)
- Actions - open a dropdown menu with further options:
- Create a new user (or copy one)
- Delete this user
- Send email invite
- Reset password
- Export data or print
- Review all users
Email invite
When you create a new user, XLReporting will send that person an email with an invite link. Users can click on that link to activate their login and enter their initial password.
If a user has not received this email (or it has gone astray in his or her inbox), you can resend that email by clicking on Actions - Send email invite.
Reset password
You can not set or change the password for another user, users can only change their own password. You can send a user a password-reset email by clicking on Actions - Send password reset.
If users have forgotten their password, they can also initate a password themselves reset by clicking on the Lost your password? link in the Login screen:
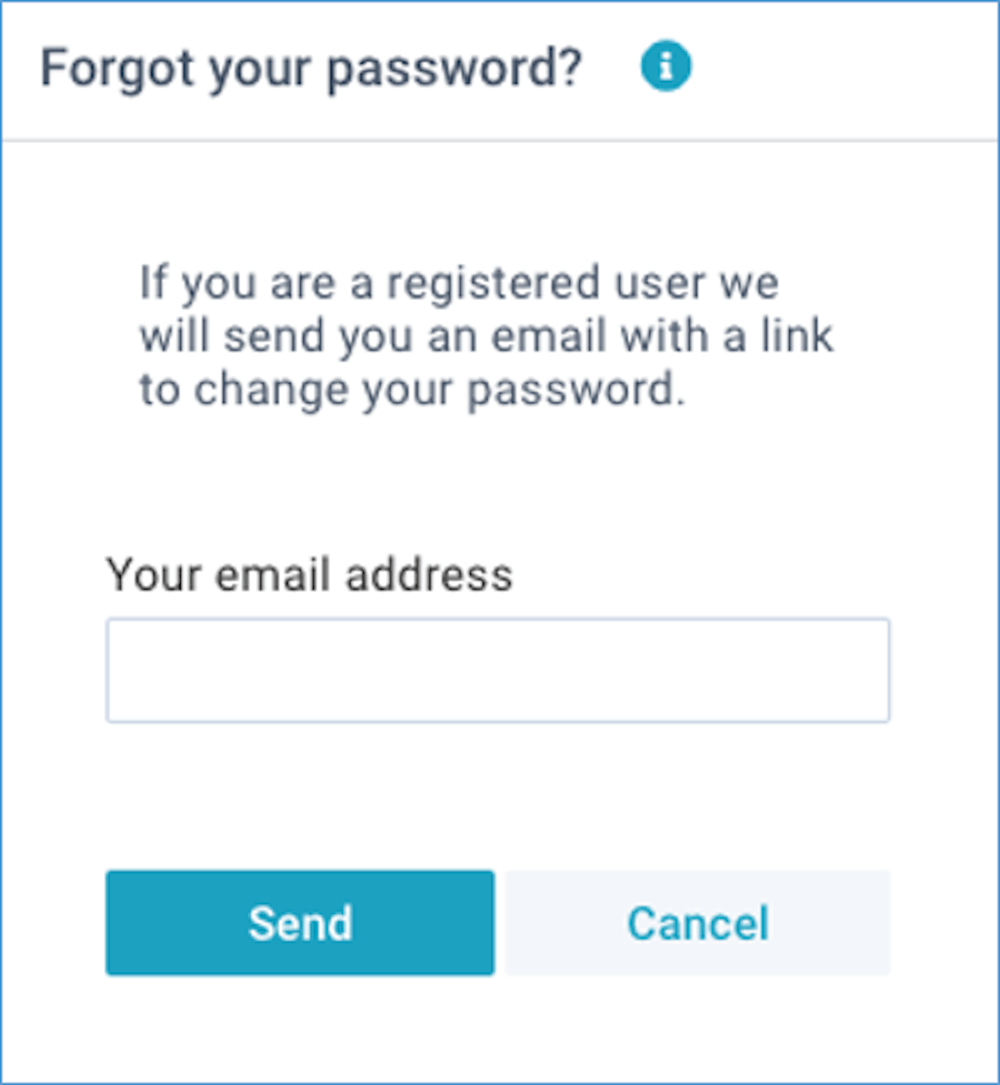
XLReporting will send an email with a temporary reset link, which enables to user to enter a new password.
- If the tenant security option Enforce SSO in Manage - Profile is set, the options Email invite and Reset password are not visible, and users can not request a password reset, nor change their password.
Review all users
Click on Actions - Review all users to review the user roles and permissions that each user has been assigned:
- By user role - shows a list of all users and the user role(s) they each have been assigned.
- By permission - shows a list of all users with the underlying permissions they have, based on the user role(s) they have been assigned.
You can also watch the tutorial video.

Security
To ensure your information is optimally protected, XLReporting enforces a number of security measures:
- Strong passwords - only strong passwords are accepted, and are encrypted.
- Password expiry - passwords automatically expire after 180 days, after which users will be forced to set a new password.
- Password reset - passwords can not be set by other persons and will never be sent over email. Users can request a "self-service" password reset, without intervention of any other person.
- Password notification - when passwords are being changed, the system will send the user a notification email, to confirm the change.
- Strong authentication - we support "Single Sign-On" (SSO) and "Multi Factor Authentication" (MFA). If your company does not use SSO, we advise all users to activate MFA. Tenant administrators can make MFA mandatory for all their users in Manage - Profile - Security options.
- Domain protection - restrict the creation of users to corporate email accounts only. We advise against using private email addresses for user accounts. Tenant administrators can enforce this in Manage - Profile - Security options.
- Locking after failed logins - users will automatically be locked after we detect a pattern of failed login attempts. The system will send the user a notification email with the IP address and browser used and a re-activation link.
- Locking inactive users - users will automatically be locked after a certain amount of time without activity. The system will send the tenant administrator a notification email. The administrator can decide to either re-activate the user, or delete the user permanently.
- Device detection - date, time, IP address, and browser is recorded at every login, and the system will send users a notification email if a new device is detected.
- Granular permissions - users can be given very granular permissions or restrictions, by combining access to menu options, access to objects, filters on the data, and read/save/import/export rights.
- Restricted exports - as part of the permissions, users can be prevented from exporting data (such as Excel, PDF, printing, or publishing dashboards). If users do have permission, all exports they run are recorded in the system.
- Full logging - all user activity is recorded and kept for 12 months.
- Full encryption - all data is encryped in transit and in the database.
XLReporting enforces multiple levels of security and access control. Read more.