Create | Settings | Source | Connectors | Mapping | Convert | Select | Selections | Transpose | Lookup | Repeat | Replace | Batch | Server import | Actions | Export | AI assistant | Review
Define imports
Imports are configurable objects that ensure data from other systems or files can be repeatedly and consistently converted and imported into data sets in XLReporting. You can give each import a name, define the source data, the target data set, the column mapping, conversions, data selections, and set user permissions.
Once created, you can run imports as often as you want to update the data in XLReporting.
You can also watch the tutorial video.
When you sign up, your tenant already has a number of predefined imports, aimed at financial reporting. They contain example data of a fictitious company. You don't have to start from scratch, you have working examples which you can start with, and you can add or change imports at any point in time.
Some common examples of imports are:
- Financial data from an accounting system
- Invoice transactions from a database
- Product list from an Excel spreadsheet
- Customer data from a CSV file
Create an import
You can create an import in two ways (watch the tutorial video):
- Click on Define - New in the sidebar menu, or click the New button in the top of the screen.
- Click on the Actions - Create new button of an existing import. This also enables you to make a copy of an existing import.
Either way, the rest of the process is the same, and you can enter a name for your new import, set user permissions for it, and define its column mapping. The column mapping of an import is shown in Excel-style with a preview of the converted data:

Settings
You can define the settings for the import via these fields:
- Name - enter a name. This must be unique within all your imports.
- Group - select how this import is to be shown in the menu navigation.
- Active/locked - activate or lock an import. When locked, this import is not visible in the menu, and no data can be imported.
- Target data - select how new data will be imported into the data set:
- Add to - add new data to the existing content of the data set.
- Overwrite - overwrite the entire existing content of the data set.
- Replace in - selectively replace existing content of the data set. For example, anytime you import a certain financial period, you might want to overwrite the previous content for that same period. If you select this option, you need to select which column(s) will trigger the replacement. Read more here.
- Update in - update the given columns in existing rows in the data set, based on the value of the Key column. This option will only update fields with a new value in existing rows in the data set, preserve all other existing data. It ignores data in the import source that does not exist in the data set. The target data set must have a defined Key column, because that is used to determine whether a given row already exists or not.
- Insert in - insert rows that do not yet exist in the data set, based on the value of the Key column. It ignores data in the import source that does not exist in the data set. The target data set must have a defined Key column, because that is used to determine whether a given row already exists or not.
- Upsert in - update the given columns in existing rows in the data set (similar to "Update in") and insert rows that do not yet exist in the data set, based on the value of the Key column. The target data set must have a defined Key column, because that is used to determine whether a given row already exists or not. Upsert is effectively the same as Update + Insert.
- Delete from - selectively delete existing content from the data set. Data that matches your data source will be deleted. No new data will be imported. If you select this option, you need to select which column(s) will trigger the deletion. Read more here.
- Data set - select the target data set. The converted and selected source data will be imported into this data set.
- Source data - select your source data. This will take you through a process where you can select the type and location of your source data. You will be able to preview that data.
- Menu/Batch - select whether you allow this import to be visible in the menu so it can be run by itself, or whether this import can only be run as part of an import batch of another import or model. In the latter case, this import will not be visible in the left-hand menu. This setting does not affect the actual function or permissions of this import.
- User roles - select one or multiple user role(s) to restrict access to this import. If you leave this blank, all users have access.
- Import batch - combine multiple imports into a batch which you can then run as one single action.
- Sort - define an (optional) sort order (1-9999) that determines where this import is displayed in the menu. If you leave this blank, the import is ordered alphabetically.
- Description - enter an (optional) description to explain the use of this import to users. The text can contain basic html tags to format your text (e.g. <br> for a next line, <b> for bold text). The text can also contain functions to include dynamic information or images in the text.
- Script - create a script to process the source data before it is being processed by the import definition. This option is for advanced use, and only visible if your user role has Edit script permission. Read more about scripts.
Choose source data
Click on Source Data to choose your source data. You can choose from the following data sources:
- Local file - select a file on your computer or on your office network. This can be any Excel, CSV, XML, TXT, or JSON file.
- Cloud file - select a file that is stored with a cloud provider, such as OneDrive, Dropbox, and Google Drive. Users will need to login to the selected service with their own credentials, and access is only granted within their own browser. This can be any Excel, CSV, XML, TXT, or JSON file.
- Connector - select one of our import connectors to common accounting systems, or manually define an API endpoint. Users will need to login to the selected service with their own credentials, access is only granted within their own browser, and remains active only until the browser is closed. Read more about import connectors.
- Data set - select one of your existing data sets. This enables you to copy or move data from one data set to another.
- Query - define a report query based on your data sets. This enables you to transform, aggregate, and/or select existing data and import the resulting data into another data set, for example if you want to summarize large data sets.
After you have selected your source data, you will see a data preview:
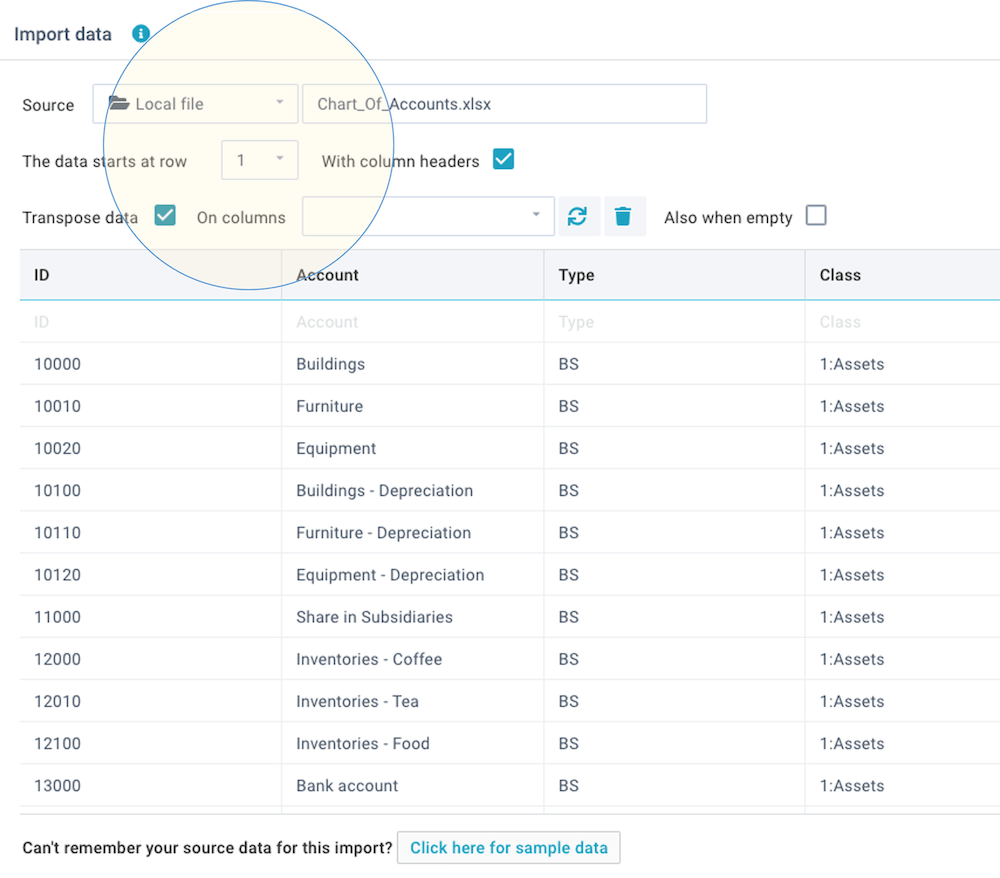
If you selected an Excel workbook, you will be able to select which sheet within that workbook you want to import. For Excel workbooks or text files, you can also indicate at which row the data starts (enabling you to ignore empty or title rows in files) and whether your file contains column headers. It is preferable to use files that contain header names, because it is easier to work with column names when importing data. If your file does not have header names, the columns are referred to by letters (e.g. Excel style such as A-Z) or column numbers (1-99).
Once you have reviewed the data, click on Apply so you can define the column mapping.
- XLReporting saves the first 5 rows of source data for later use, as sample data for visual aid when (re)defining the import or when running the import. When working with sensitive data, please ensure you are using test data when defining the import, instead of real data.
- If necessary, you can click Actions - Run AI assistant to mask any sensitive data (replacing letters and digits with the * character).
Define column mapping
Once you have selected your target data set and your source data, XLReporting will try to automatically match the columns in your source data to those in your target data set. You can always edit this where required.
You can also watch the tutorial video.
The column mapping is shown in Excel-style with a preview of sample data (the first 5 rows). Please note that this menu option enables you to configure an import, but it does not actually import the data. Once you have defined an import, you can run Run Import whenever neeed to import the data on an ongoing basis.

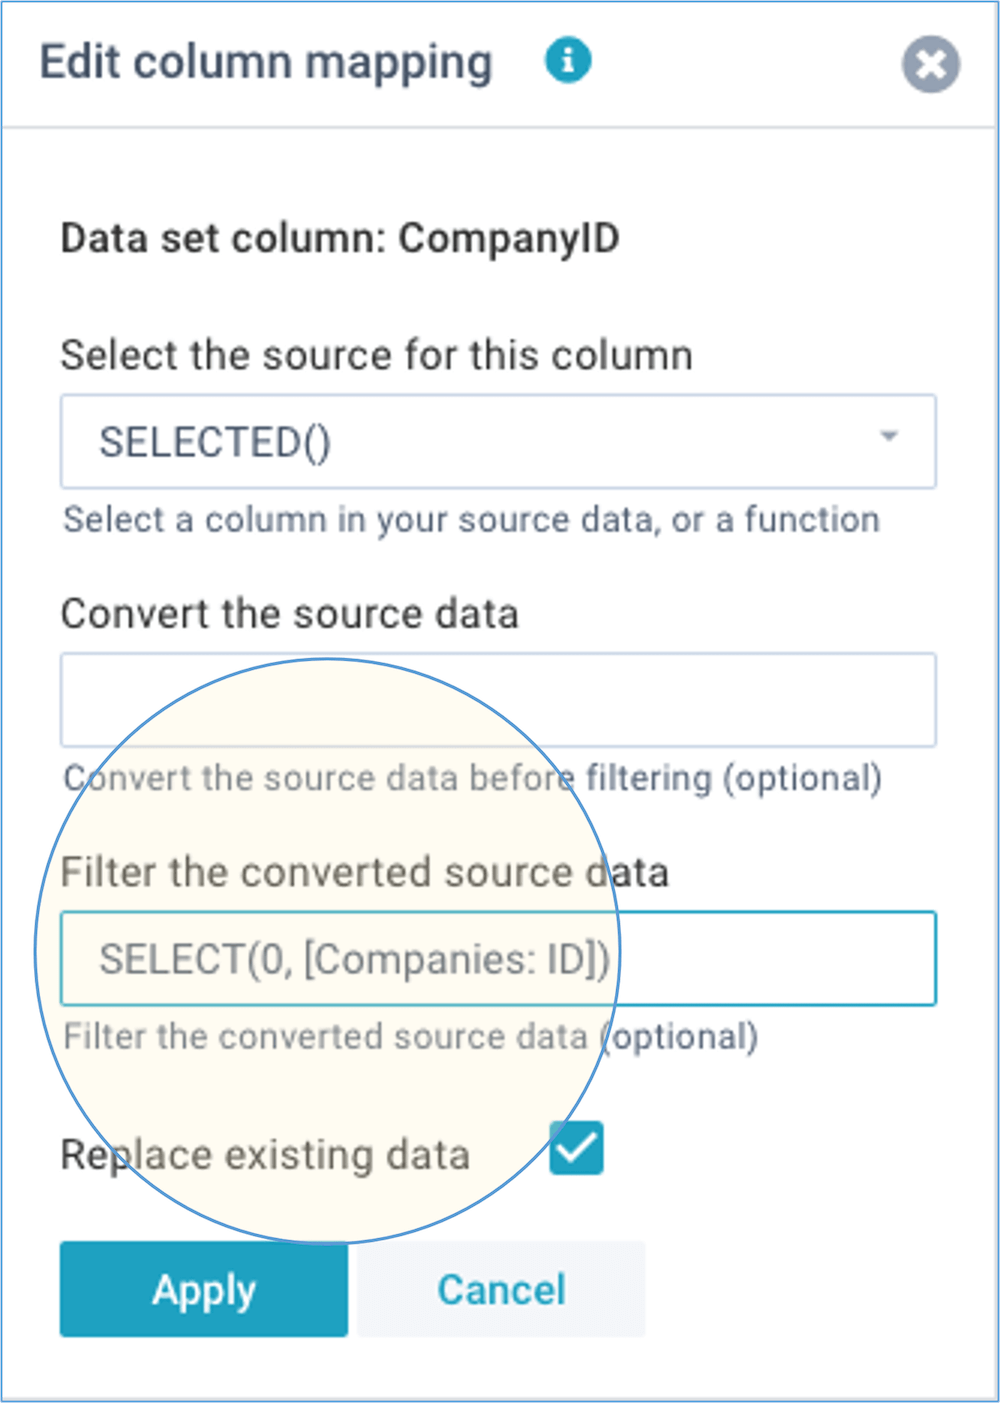
If you want to change the order of the columns, just drag them to the left or right. You can edit a column mapping by clicking on its ⚙ Mapping header, which opens the following window:

You can select the source or other content for each column in your target data set, by choosing from the following:
- A source column - select a column in your source data. If your source contains column headers, the dropdown list will show those, otherwise the list will show letters (in Excel style: A-Z) or column numbers (1-99).
- VALUE() - select this if you want to import a defined static value. An extra field will appear where you can enter that value. This value will be used for all rows in the import.
- SELECTED() - select this if you want to import a value selected by the user when they'll run this import, rather than a value from the source data. The user will be presented with a dropdown list of the current values in your data set, and will need to select a value. This value will be used for all rows in the import. Read more.
- LOOKUP() - select this if you want to lookup values in another data set based on some information in your source data. You can create the lookup key by either using a column value or an expression. Read more.
Convert the source data
Once you have selected the source, you can optionally convert or recalculate the source data. You can enter a simple function or an expression with multiple functions and operators. An expression can contain the following elements:
- The reserved word data - this is a placeholder for the current value of a
column in your source data. Use this every time you want to refer to the current value in an
expression. For example, to multiple the value in a column by 100:
data * 100 - Columns names in source data - to reference columns in your source data,
you can simply enter their name enclosed between square brackets. For example, to substract
the Credit column from the Debit column in your source
data:
[Debit] - [Credit] - Column names in the target data set - to reference the results of other
mapped columns in the target data set, you have to prefix them with "Target: " between the
square brackets. For example, to divide the Amount column in the
target data set by 1000:
[Target: Amount] / 1000 - Functions - you can choose from a large
collection of functions with the same syntax as in Excel to perform a large
variety of text, data, and number operations. Some examples:
ROUND([Amount], 2)
LEFT(data, 20)
IF([Unit] = "Actuals", [Amount], 0) - Static values - you can use any static value in your expression. Text
values must be enclosed by " (double quote) characters. Some examples:
data / 1000
data + " some added text"
IF(data = "Sunny", "warm", "cold") - Operators - you can use all common operators, such as: + - * /
and you can use brackets ( ) to control the sequence of operations. For example, to
substract the Credit column in your source data from the
Debit column in your source data, divide it by 1000, and then round the
result to 0 decimals:
ROUND([Debit] - [Credit]) / 1000, 0)
✭ Notes:
When converting data, you can refer to other columns. If you refer to other columns (which may
themselves contain expressions or calculations), please make sure these fields are positioned
to the left of the field that is referencing them. The order of fields in the
data set is not relevant, all that matters is that the calculations in the import are being done
in the right order, and if needed you can simply drag fields to the left or right in the import
definition.
Here is a practical example with a screenshot:

You can also watch the tutorial video.
Select the import data
Once you have selected the source column, and optionally converted or recalculated its value, you can select the data. Selection means that you can include (or exclude) rows in your source data from the data import.
You can specify a static value, a simple function, or a complex expression and you can use all common operators. You can choose from various filter functions.
You can also watch the tutorial video.
The below example selects only rows with a certain range of accounts, so only those will be imported:

You can also use SELECT() to present the user with a dropdown list of values.
User selections
In many cases you might want the user to select some value when they start an import. For example, the company they're about to import, or the period. You can achieve that by using the SELECT() function.
You can also watch the tutorial video.
The below example uses a SELECT() to present the user with a list of company codes (using the values from another data set). By using SELECTED() in the source column the selected company code is then imported into the target data set:
Transpose source data
When importing from Excel workbooks, you may often find that information is laid out in columns, for example period-by-period amounts. XLReporting enables you to transpose that column data into rows, so you can store it optimally in data sets. Simply select the column names in your source file that you want to transpose:

This will transpose the selected column data and you can use the 2 special columns TRANSPOSE in the column mapping to your data set.
By default, the transpose operation will skip empty values and zeros. If you want to transpose all columns onto all rows even if they are empty, you can do so by selecting the Also include empty option.
You can also watch the tutorial video.
Lookup data
Another common scenario is to look up some value in another data set, based on data in your import file or some other logic. Let's assume an import file contains local Chart of Account numbers that need to be converted to a central Chart of Accounts.
You can also watch the tutorial video.
The below example uses a LOOKUP() to lookup the central account code based on the combined company code and local account code in your import file. The looked up account code is then stored in the target data set:

Repeat empty values
The option when empty enables you to define the action when a field has no source value: either skip the entire row, abort the entire import (nothing will be imported), or repeat the value from the previous row (which is useful if your import data is grouped).
Replace data
When you define an import, you can decide how newly imported data relates to existing content of the data set: do you want to simply add to the existing content, or do you want to completely overwrite all existing content, or do you want to update existing data? Or perhaps you want to selectively replace or delete existing content based on certain criteria?
If you choose to replace or delete data, you need to select one or more column(s) that will be used to decide which data to replace or delete. The import will use the selected values on these column(s) (e.g. SELECT, SELECTED, or fixed values) if these are defined, or else the realtime values in the source data, to replace or delete existing data.
A practical example is importing financial data for a given financial period: most users want to be able to import subsequent (updated) versions, but without duplicating anything. To achieve that, you should select Replace in and Replace existing data for the relevant column:

You can select multiple columns, for example company and period. In that case, any existing data for the same company and period will be deleted, before the new data is imported.
The option Delete from is similar in that it deletes matching existing content in the data set, but without importing any new data.
Define import batch
Click on the Import batch field to combine multiple imports into a batch which you can then run as one single action. This is useful if you want to process related tasks during, before, or after a given import.

You can insert or delete imports at any time, and re-order them, using the dropdown menu in the last column.
By default, imports will be started in the order that you define them, and processed in parallel (i.e. near simultaneously). This gives the fastest performance in general, but if you have certain imports that require other imports to be completed first, you can set Wait in line. When this option is set for an import, it will only be started and processed once all its predecessor imports have completed.
Server import
By default, the source data for imports is collected and processed in the user browser, and the result is sent into the target data set in XLReporting. This enables you to select a local file, or login to an accounting system etc. However, if the source data for an import is an existing data set in XLReporting, it is far more efficient to process the import on our servers. Even very large imports will complete instantaneously.
When you define an import, XLReporting automatically decides if it can be run on the server. This is generally the case if all following conditions are met:
- the import source is a data set in XLReporting
- the import does not include a LOOKUP field source
- the import does not include a convert expression
- the import does not include a script
Actions
When defining an import, you can use the Save and Actions buttons in the right-top of the screen:

These buttons enable you to do the following:
- Save - save your changes (or Ctrl+S)
- Actions - open a dropdown menu with further options:
- Create new import (or copy one)
- Delete this import
- Preview and test
- Export data or print
- Run AI assistant
- Review this import
- Mark this version
- Run this import
Please note that the list of actions is dependent on the permissions (in your user roles) that you have been given.
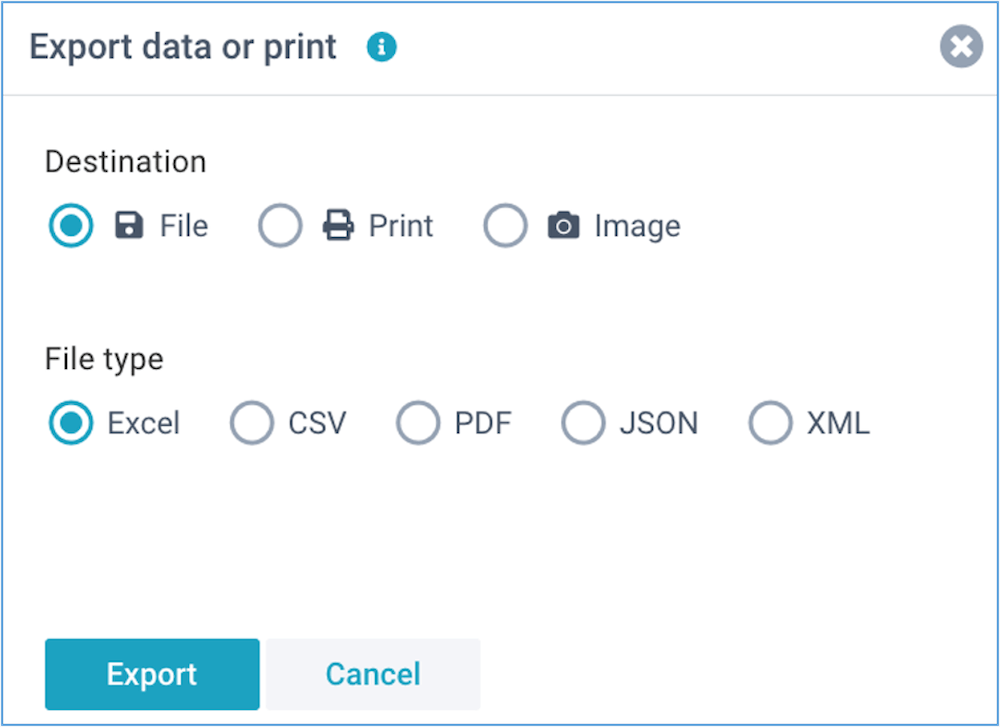
Export data or print
All reports in XLReporting can be exported to Excel, PDF, JSON, XML, CSV, as well as be
printed.
Please note that this option is only visible if your user role has Export
data permissions.
You can also watch the tutorial video.
AI assistant
The AI assistant can automatically convert, translate, and transform your data. Please refer
to Run AI assistants for more information.
Please note that
this option is only visible if your user role has Run AI assistant
permissions.
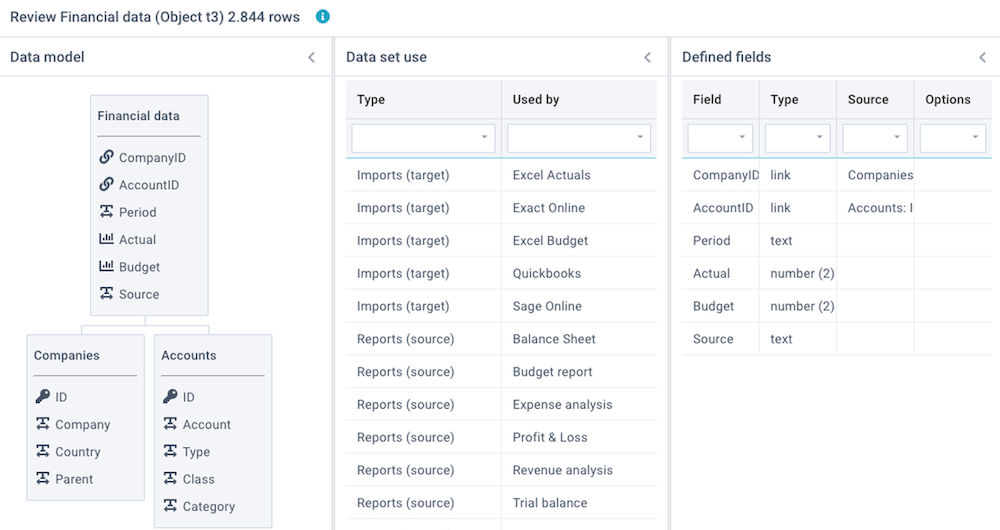
Review this import
Click on Actions - Review this import to review a number of aspects of this import and its target data set:
- Data model - shows a diagram with all linked data sets. This is derived from columns that are set to data type Linked values.
- Linked objects - shows all linked imports, reports, and models that are using this data set, and the total number of data rows in this data set.
- Linked data - shows the results of checks on the Key values and Linked values that are used to link data sets. Because linked values need to correspond with key values, this integrity check is important.
- Defined fields - shows a summary of all defined columns and data types.
- Recent activity - show all recent user activity relating to this data set.
You can also watch the tutorial video.